

How To Repair Fiberglass On A Boat
How To Repair a Fiberglass Boat
Few things are more disheartening to the gunkhole owner than staring at the fuzzy edge of broken fiberglass. However, the repairability of fiberglass is one of its best characteristics. The most horrifying pigsty in a fiberglass hull is quickly healed with a bit of glass fabric, a supply of resin, and equal parts skill and care. And the repair is less patch than graft — a new piece of skin indistinguishable from the former.
Fiberglass lay-up is nothing more than layers of drinking glass cloth saturated with polyester (or epoxy) resin, withal almost boatowners imagine a self-applied repair as just slightly more durable than a wet Rough-and-tumble. This is a false business organization. Follow a few unproblematic rules and your lay-upwards volition be simply as durable every bit the rest of the boat.
Cutting Away the Damage
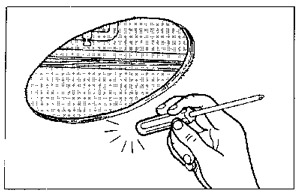
Impact impairment nearly always results in some associated delamination. Tap the impact area with the cease of a plastic screwdriver handle to make up one's mind the extent of the harm; solid laminate sounds sharp, delamination dull. Check inside the boat to make sure zilch is in the way, and so make a round or oval cutting to remove the damaged area. Never try to salve damaged fiberglass; always cut it out and replace it with new laminate. Check all the edges and enlarge the pigsty if you observe any boosted delamination.
Working from Within
If the harm area is minor and in a higher place the waterline, make the repair from inside the hull, if possible. Yous are going to bevel the border of the hole with a 12-to-1 chamfer, then if yous repair a 3-inch bore pigsty through a one/2-inch-thick hull from the outside, yous end upward with about 15 inches (diameter) of surface harm to refinish. Repair information technology from the within and you have only a three-inch hole to refinish.
A second reason to make the repair from the within is that you tin back the hole on the outside with a polished surface, creating a mold that allows you to lay-up the repair the same manner the gunkhole was built--gelcoat first. Very footling finish work volition be required.
Dewax
Before grinding, always wash the area around the hole thoroughly with a dewaxing solvent. The original fiberglass will have traces of mold release on the outer surface and wax surfactant on the inner surface. If y'all fail to remove the wax first, grinding will drag information technology into the bottom of the scratches and weaken the bond.
Grind
During the lay-upward procedure, because each layer is applied before the previous one fully cures, each application of resin links chemically with the previous ane to form a solid construction--every bit though all the layers were saturated at once. Unfortunately, no affair how potent the laminate-to-laminate bond, the initial bond of any repair is mechanical, not chemical. Consequently, grinding is the key to getting a strong repair.
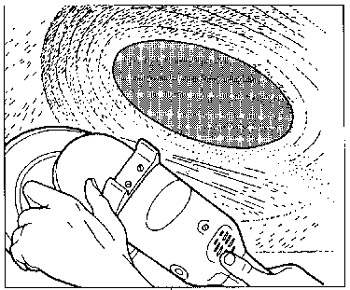
Utilize a disk sander loaded with a 36-dust disk to grind a 12-to-1 bevel around the perimeter of the hole inside. Also grind a rectangular surface area of the inner surface a few inches beyond the bevel to adapt a finishing layer of textile. Protect your eyes with goggles and your lungs with a good dust mask. Long sleeves will reduce skin irritation. Tilt the sander and then that only i side of the disk is touching the surface and the dust is thrown away from yous. Afterward you castor abroad the dust and wipe the area with an acetone-dampened rag, the sanded surface should have a uniform dull expect.
Mask and Mold
To prevent whatever resin runs from adhering, give the exterior surface of the skin around the hole a heavy coat of paste wax, taking care not to become any on the edge or inside the hole. Mask the area below the hole.
Cut a scrap of smooth plastic laminate (Formica) or thin clear acrylic (Plexiglas) a foot larger than the hole. Wax this backer, so spritz it with polyvinyl alcohol (PVA) mold release. Screw or tape the backer to the outer surface. If the hull is flat or curving in just one direction in the damage expanse, the backer will assume the correct curve. If the hull is spherical, i.due east. curving in two directions, acrylic screwed to the hull tin sometimes exist coaxed into the right shape if warmed with a heat gun (before applying the mold release).
Material
Cut sufficient fiberglass fabric to fit the pigsty. Unless you have reason to follow a different schedule, begin with 2 layers of 1 1/2-ounce mat, then alternate mat and six-ounce fabric. The number of laminates will be adamant by the thickness of the hull; you volition roughly need one layer for every 1/32 inch. Cut the first layer of mat the total size of the ground low, then cut subsequent pieces about an inch smaller. This lodge of largest piece get-go, then progressively smaller pieces is how you are going to use the new fabric. We exercise information technology this counterintuitive way, particularly with polyester resin, considering it maximizes the surface area of the secondary bond, the adhesion of the new cloth to the old laminate.
Using Polyester or Vinylester Resin
For above-the-waterline repairs you tin can use either polyester or vinylester resin. Of grade, for an fifty-fifty stronger repair you can too apply epoxy, only not if the surface of the repair volition be gelcoat. (You should utilize epoxy for underwater repairs.)
If you lot are doing your repair with polyester or vinylester resin, yous demand laminating resin. Laminating resin does not fully cure while exposed to air, which allows you to get a chemical bond between the multiple laminates you lot volition be applying. To get the final laminate to cure, you simply seal it from the air, either with a plastic or by coating it with polyvinyl booze (PVA) mold release.
Catalyst
The catalyst for both polyester and vinylester resin is methyl ethyl ketone peroxide, or MEKP. Do not confuse MEKP with the common solvent MEK; they are not the same.
Polyester resin normally requires 1 to ii percent of hardener past volume (follow the manufacturer's instructions). Every bit a rule of pollex, four drops of hardener will catalyze ane ounce of resin at i percent. Exist certain to stir the goad in thoroughly or part of the resin will exist undercured, weakening the lay-up.
You can adjust the cure time by adding more or less catalyst. Temperature, weather, and the thickness of the laminate all affect curing times. Some experimentation is generally required. The mix shouldn't kick (start to harden) in less than 30 minutes. Hardening in about two hours is probably platonic, merely overnight is but as good unless the wait will hold you up. E'er err on the side of too little catalyst; if y'all add too much, the resin volition "cook," resulting in a weak lamination.
Gelcoat
Gelcoat is essentially pigmented polyester resin. First the repair by spraying or brushing about xx mils of color-matched gelcoat onto the waxed backer. Bank check the gelcoat thickness with a toothpick; ane/32 is virtually 30 mils.
Lay-up
When the gelcoat kicks, moisture it with polyester resin and lay-upwards the first two layers of mat and one layer of fabric, compressing them against the gelcoat and working out all voids and bubbles with a resin roller and/or a squeegee.
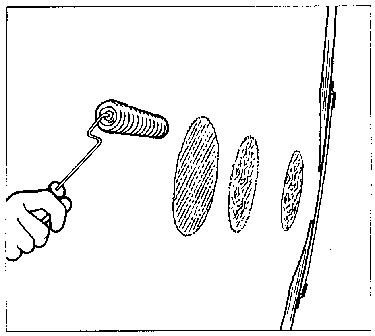
Let the commencement three plies kicking, so lay upwards iv additional plies. Never lay up more iv plies at a fourth dimension or the generated heat may "cook" the resin and weaken it. Continue the lay-up four plies at a time until the repair is flush with the interior surface.
Cease
For a finished expect, cut a rectangular piece of mat and one slightly larger of cloth and apply these over the patch, smoothing them with a duster. Seal this summit layer with plastic or PVA to allow a full cure.
Remove the backer from the exterior surface. Fill imperfections in the new gelcoat with gelcoat paste and allow information technology to cure fully. Clean the area around the patch, then sand, if necessary, and polish the repair area.
Author
Don Casey
Contributor, BoatUS Magazine
Don Casey has been i of the most consulted experts on gunkhole care and upgrades for thirty years, and is one of the BoatUS Magazine'southward panel of experts. He and his married woman cruise aboard their xxx-footer part of the year in the eastern Caribbean. His books include Don Casey'due south Complete Illustrated Sailboat Maintenance Manual, and the recently updated This Old Boat, the bible for do-it-yourself boaters.
BoatUS Magazine Is A Benefit Of BoatUS Membership
Membership Benefits Include:
-
Subscription to the impress version of BoatUS Magazine
-
4% back on purchases from West Marine stores or online at WestMarine.com
-
Discounts on fuel, transient slips, repairs and more at over ane,200 businesses
-
Deals on cruises, charters, car rentals, hotel stays and more…
-
All for only $25/yr!
Source: https://www.boatus.com/expert-advice/expert-advice-archive/2012/july/how-to-repair-a-fiberglass-boat
0 Response to "How To Repair Fiberglass On A Boat"
Post a Comment