

How To Repair Walls After Removing Wall Paper
I have over 20 years of experience painting, including getting rid of erstwhile, croaky paint and making walls look like new. Here'south how I do it.
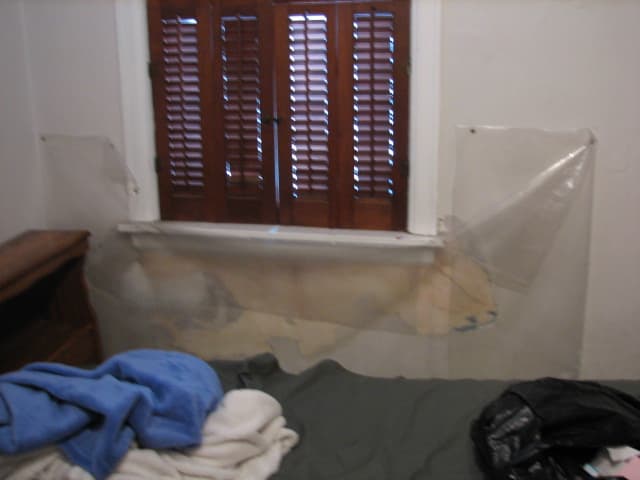
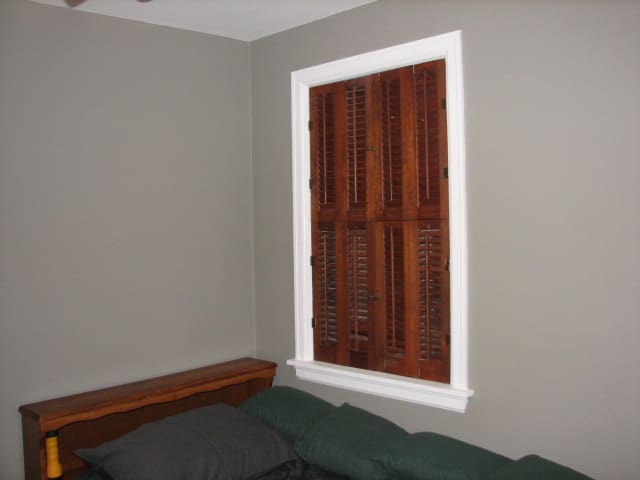
Under this window, moisture damage ruined the paint and some of the plaster.
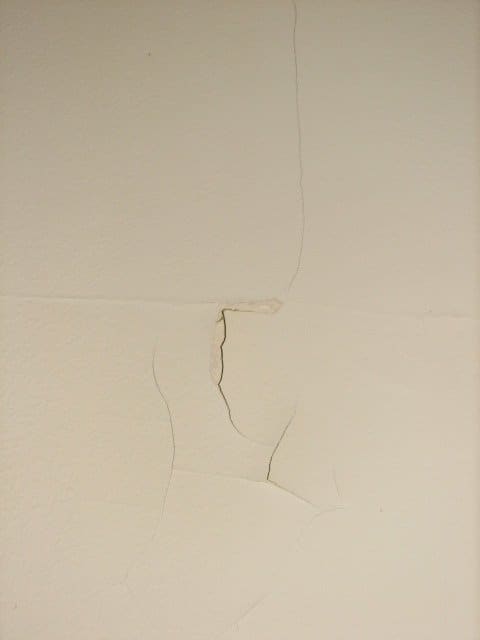
Cracked Paint
Many older homes have been painted so many times that the paint becomes a series of thick layers. Humidity, moisture, and fourth dimension accept a fashion of causing these layers to separate and chimera, eventually leading to smashing and chipping. When this happens, removing the loose paint is a must, but the pigment removal will go out the walls uneven. To restore your walls to a smooth, even surface, the damaged areas must exist reworked.
This work is not hard, and the cost to exercise the job is minimal. When you do the repairs, it volition add a professional quality to your finished walls, and you volition feel good well-nigh the work invested.
How to Remove One-time, Cracked Paint
- The first will be to clean out all the old, damaged paint and plaster that has come loose.
- The second step is to resurface the damaged expanse. I telephone call this floating the wall or ceiling. This sometimes requires several applications of sheetrock compound which I will refer to as MUD.
- The last stride will be to sand to a finish and use a couple of coats of primer/sealer.
The terminal event will depend on the amount of care put into a relatively easy job. The problem comes with having the patience to accept your time and do a good job of it. Read on for detailed descriptions of each of these steps.
Fourth dimension to Gear up Things Up!
What You Will Demand
- vi-in-one tool
- mud knife or straight-edged trowel
- mixing bowl
- spatula
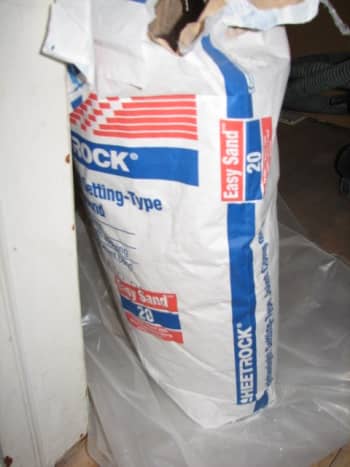
- sheetrock joint compound (this can be bought already mixed in small to large buckets or numberless or you can purchase dry joint compound and mix it yourself)
- sanding block
- sandpaper
- shop vacuum
What Almost That Joint Compound?
I like to buy information technology in dry form for two reasons. The first is that you mix only what you lot need and the remainder will terminal a long time as long every bit you do non get it wet. The second reason I would rather mix my own mud is that I can vary the consistency of the moisture mud to utilize the product for different forms of application.
The dry compound also comes in different drying times. You can purchase a quick prepare that will begin to stiffen in as niggling as 20 minutes, or you can get a slow set that takes an 60 minutes to stiffen. I generally apply the quickest set because I am usually in a hurry doing repairs. The slower-setting compound is all-time to use when you are working on larger areas.
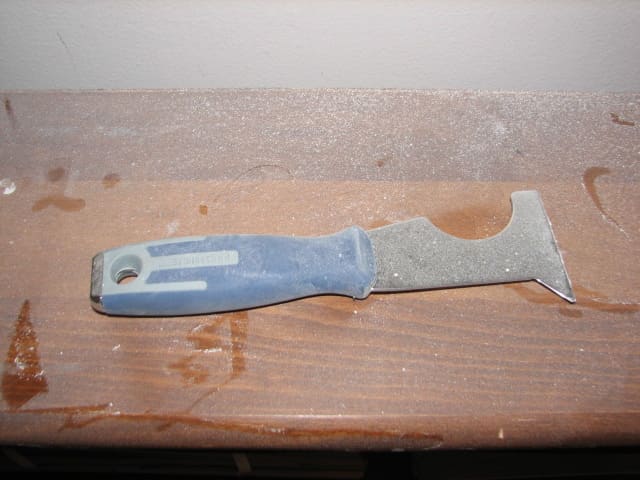
6 in 1 Tool.
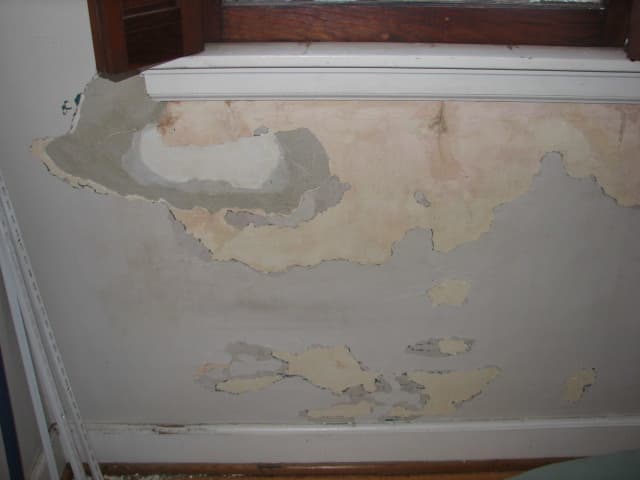
Cleaned and scraped: ready for repair.
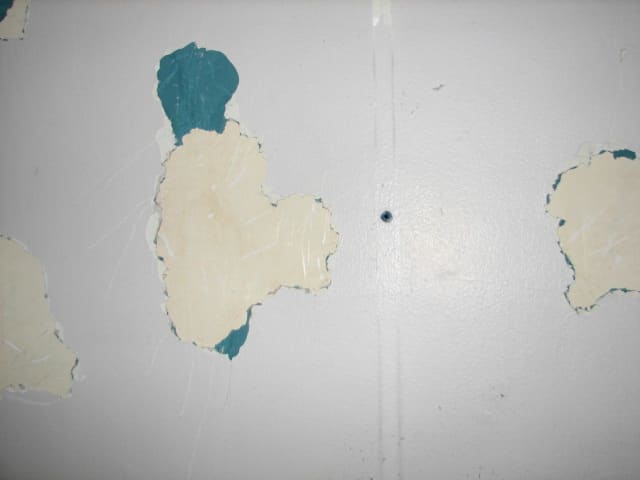
Years of layered pigment.
Step 1: Remove Loose Paint and Debris
The first thing yous have to exercise is get rid of all the loose paint and droppings that is peeling from the wall or ceiling. I like the handy "6 in one tool" for this job. It has a couple of dissimilar edges on information technology that you tin use to gouge, score, and scrape with. That is the perfect tool for opening up the bubbling and cracks.
You can use the flat edge to scrape abroad the loose paint and sometimes part of the plaster or sheetrock. So y'all tin can use the pointed border to choice in tight spots and gouge out small-scale loose areas. This tool is also slap-up when you come up to one-time caulk because you can dig in and under with it and information technology takes care of well-nigh everything you need to go removed. I usually have a grinder and use it to keep my "vi in one" very precipitous. It makes the work go faster if the edges are honed down to a precipitous blade.
Roll to Continue
Read More than From Dengarden
When I have everything cleaned out with the 6 in 1, I take a sanding block and speed over everything to ensure that all loose areas are gone. This does not require serious sanding, so just speed through. You should and then use a damp cloth to wipe abroad grit. Now the area is set for repair.
Step ii: Refloat the Wall
At present that the bubbles and cracks in your paint are opened up and scraped clean, information technology is time to refloat the wall. What that actually ways is putting an fifty-fifty coat of mud on the holes and then that the wall is smooth and back to the original flat surface. This is a little flake tedious, simply I believe anyone can do it if they have their time and are conscientious.
I wrote a little about the sheetrock joint chemical compound in a higher place. I am using this because I like the way it performs. At that place are other products that you can purchase for the same purpose just personally, I do not like them as much every bit the sheetrock joint compound. Y'all can utilize Plaster of Paris. In that location are other name-brand products on the market place. I know I have used everything they industry and I always go back to the joint compound. I always utilize the powdered form that you take to mix yourself. I told y'all why simply allow me expound.
- Powdered joint compound volition keep for a long time, like several years if you continue it dry out. It is non like the premixed saucepan product for a couple of reasons. They must put some kind of stabilizer in the premixed mud. Information technology does non feel the same when you are working with it. As well, later on the container is opened the product starts to dry out. Information technology first dries effectually the edges of the container that information technology comes in. No matter how hard yous try to keep information technology covered it will brainstorm to dry out the 2d information technology makes air contact. Nearly repairs of whatever size will crave more than than one application.
- Each time you open the container you are exposing the premixed mud to the air. About the third or 4th time you lot open up the container yous showtime to get crusty, semi-stale pieces of the joint compound falling downwardly off the edges of your container and right into the good mud. Now when you are trying to carefully spread an even layer of the mud onto the wall and a hunk of the crusty stuff gets into the good mud, it drags a hole in your moisture work area. This will make you crazy as you volition have to stop and selection out the little dry hunk and so try to refloat your work. It is just also abrasive for me.
- The other matter nearly the premixed joint compound is that it is in a container that costs more than to package and yous will pay two or three or even four times equally much for the premix. Know what are you paying for besides convenience? The reply is water. That irks me too. So the fact is that you are better off purchasing the powdered chemical compound and mixing up what you need.
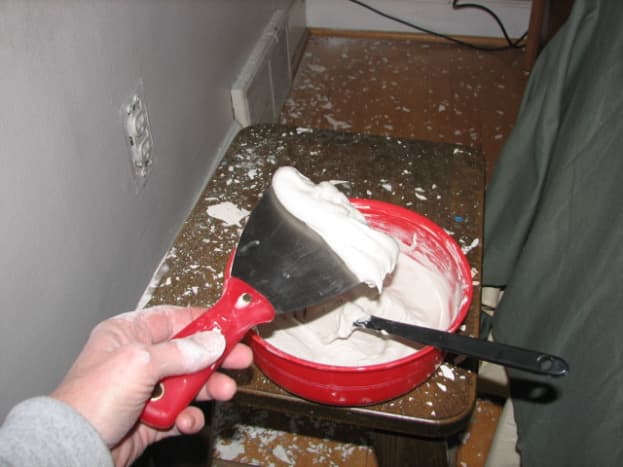
Step three: Add Sheetrock Mud to the Damaged Areas
At present that you take your compound mixed, you can offset to float the new finish. The offset application of mud will not do the task. It commonly takes two, three, and sometimes four applications to go it right. That is why I like the fast gear up formula. You tin start in one area and utilize the first coat and move on to other repair areas. By the fourth dimension you have the entire commencement application in all the damaged spots, it might exist dry plenty to start sanding. I always make sure to put the starting time coat on thin not more than than 1/eight of an inch thick. This is a good way to go on the sanding to a minimum.
I also like to use a fan or portable heater to terminate the drying toward the cease. This will aid ensure that you lot do not hit soft compound. Pay close attention to the color of the sheetrock chemical compound y'all applied. It will be gray when it goes on simply then it turns white equally information technology dries. Soft spots that are not completely dry out will not be fix to sand and they volition nevertheless be grey in the deepest areas. Make sure it has all turned white earlier you sand. You lot can run into in the adjoining photo how the edges are starting to turn white. Make sure to picket for soft gray spots.
Sand with fine sandpaper on a sanding block. Then mix more than sheetrock compound and add another thin layer of the mud to fill deep areas and practice the same as you did in the start step. Employ a sparse coat on everything and look for it to dry. The sanding should just be done to the point where the new mud is level with the existing walls. Exercise not sand too deep. Run your hands over the areas y'all take worked to feel for imperfections and also visually audit your piece of work.
This repair required five applications of sheetrock compound to get it dorsum to the same as the original wall. It becomes a smaller and smaller corporeality to fill as the layers of dried mud build to class your new wall surface. It is not really difficult piece of work it only takes time. Brand certain to have adequate ventilation when you are doing this kind of work. Y'all should always article of clothing a mask over your face to prevent as much inhalation of the sanded grit as possible. The meliorate the quality of the mask the better for your health.
I always vacuum in between sanding to help keep the dust to a minimum. The less grit, the meliorate. I go through shop vacuums pretty regularly. The fine dust is difficult on the motor of the vacuum so y'all can imagine how hard it tin be on your lungs. It is smart to employ the all-time filters for your vacuums too. The better ones cost a little more just the benefits for you and your automobile outweigh the expense.
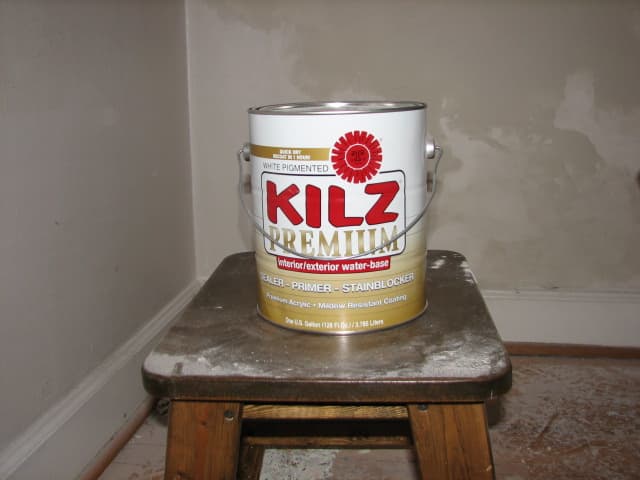
Kilz is my favorite sealer/primer.
Step 4: Seal, Prime, and Paint
The wall should experience nice and smooth and you should not exist able to feel a difference in the level of the wall. If you feel a hump, you need to sand downwards. If you feel a dip, you need to make full it with another awarding of sheetrock compound. When you are satisfied with the way information technology feels and looks, you are ready to finish with a sealer/primer. I always use Kilz make primer because it has always done me a good job and I have been using it for over 20 years. At that place are other primer/sealers on the marketplace, simply Kilz is my become-to product.
I always apply two coats to the entire wall. The start coat will seal the new repair and the second coat volition requite you a squeamish even wall that is uniform in color and set up to paint. It is a good idea to wipe down the walls before you employ the primer. I do this with a dry make clean material and I besides run a vacuum over the walls and everything around the work surface area. The less dust, the better the pigment chore. It is better for your health likewise.
So there you have it. This work can be accomplished by anyone willing to take the time and endeavour and it volition save you a bundle compared to hiring a professional person. Skillful luck on your repairs.
The finished product.
This commodity is accurate and true to the all-time of the author'southward knowledge. Content is for informational or entertainment purposes only and does not substitute for personal counsel or professional advice in business, financial, legal, or technical matters.
© 2009 C.S.Alexis
tawd on October ten, 2022:
Heyyy, and so my crackling paint situation resides on a brick wall, at to the lowest degree one layer under the summit one, in the bathroom of my 1930's cottage.
Obviously I can't skim coat brick, so I was wondering if you had whatsoever thoughts?
Thank you
Kat on September 10, 2022:
Pakistani repair/maintenance guys here in Dubai should learn this. Their work are below tolerable!
Kelly B. on Baronial 09, 2022:
I merely wanted to tell you how incredibly helpful this article was! These quondam houses can exist bears to work with just knowing other people do it, makes me hopeful! Thanks!!!
NYC D on July 14, 2022:
Howdy, does everything in the commodity above apply also to physical / "plaster" walls? That's what we accept--physical aka plaster aka masonry walls. (At least I *think* all those phrases hateful concrete. In whatsoever event, our walls are definitely not drywall/sheetrock.) And so practice any of the steps you lot list NOT apply to our walls? In any event, thanks for the great write-up!
Traycee on March 25, 2022:
This is exactly my problem. I noticed a pocket-sized bubble on wall. I scraped information technology thinking it would exist a small quarter size repair. It turned into a large expanse of paint that was loose. I am going to attempt to repair that section of the wall. Is the mud applied over the entire section where the paint came off OR merely around the edges? Thanks
Lorenzp on March 17, 2022:
we telephone call that tool a v-in-1,not 6-in-1
midori on December 26, 2022:
Thank you for taking the time to craft such a detailed explanation. Very helpful and much appreciated.
Sharon Whittington from Labarque Creek, MO 63069 on Nov 13, 2022:
Wow! Cool:)
PATRICIA on Baronial 18, 2022:
VERY USEFUL AND PERFECTLY EXPLAINED! THANX!!!
Bishop55 on June 24, 2022:
Dandy hub! Voted up!
C.Southward.Alexis (author) from NW Indiana on October 20, 2022:
I have no proposition other than to practise some enquiry so that you do not create dangerous work conditions. Better to take fourth dimension to notice out than make a mistake.
Chris on October xix, 2022:
And so what are you suggestions for fixing a wall that potentially has lead based paint?
philipandrews188 on Baronial 31, 2022:
Very very useful hub.
C.South.Alexis (writer) from NW Indiana on November 18, 2022:
mommyofalot,
Nosotros had the same situation. The clammy wall on this projection was being caused by water running off the roof. The gutters had to be repaired outside. It is all-time to detect the source of the dampness before doing the repair or information technology will come back on you lot.
The wall can be stale out subsequently the source has been repaired using a dehumidifier and a fan. This may accept a few days, but information technology is worth it to make sure there is no dampness before repairing your wall.
mommyofalot on November 18, 2022:
The wall in my bathroom looks alot like your wall originally did. And y'all did a WONDERFUL chore fixing it< which motivated me (since yous added step by step instructions). The weird thing though is the pigment originally bubbled so I used a mud knife to scrape and removed the pigment and damaged parts off of the wall. At present that I'm ready to fix it the wall it clammy to the bear upon so I dont know what would cause that. When we moved in iii years ago the house was inspected but im wondering would wet walls be something that is checked for. Do you have any suggestions on what I tin can do to dry the wall and keep information technology dry before I repair it.
C.S.Alexis (author) from NW Indiana on Oct 25, 2022:
agvulpes,
No damper at all. In fact i should have mention taking precations for a pb based pigment. Thank you for bringing information technology to my attending.
Peter from Commonwealth of australia on October 25, 2022:
How-do-you-do C.S. you lot certain know your stuff and I practise not envy anyone the job of repairing plaster walls. From the pictures in this Hub yous have done a swell chore.
One discussion of alarm which should be spelled out in loud words is the fact that a lot of the old paint independent a very dangerous metallic chosen 'lead' and if this is in the paint that is being sanding the results could exist quite disastrous for the painter and and children that breathe in this dust! Modern paints these days do not have 'atomic number 82' in them!
Distressing to put a damper on such a wonderful Hub !
Morris Streak from UK on May ten, 2009:
I agree. Maintaining one'southward house can exist a pain, especially when one doesn't have the patience to fix it. Good hub. You certainly know what you're talking about. Plus, the photos document well the point you were getting across. In a a way, I'1000 into business firm repairs myself.
SuperiorInteriors from San Diego, California on March 17, 2009:
My Landlord has had the bathroom repaired improperly in the past and it was subject to an most complete deterioration. After removing the onetime garbage, I relaized the whole basically went clear through to the houses exterior. Well patched that one upward and my next plan is to discover a new landlord.
Good communication and very useful hub.
C.S.Alexis (author) from NW Indiana on February 12, 2009:
Samanta,
The thing to do is if you can utilize the pigment do not put it on the same wall as anything you have already painted with this color. If you tin start a fresh wall with it and the remaining pigment is not full of lumps I say use it. The difference in color will not be noticeable plenty to matter because a different wall will be picking upwards a dissimilar bending from the calorie-free. I would non use it for touch up on anything that yous painted ii months agone. More likely it volition not lucifer.
Samanta on February 12, 2009:
Unfortunately a container with total of icidulux 3 in i wall pigment remained open up for 2 months. As a result a thick hard layer has formed. Can anybody propose me whether I tin use the remainder paint below the thick layer? Is in that location any reaction with air under such condition? Whether the color volition remain aforementioned or not?
SweetiePie from Southern California, USA on February 06, 2009:
Today I had to put in a new doorknob and spackle the cracks around the where the erstwhile knob had been. Information technology is not exactly painting, merely this hub was helpful because spackling needs to be done in layers just like painting.
C.S.Alexis (author) from NW Indiana on February 05, 2009:
Hoopskirtman,
I am blessed to accept a few skills so I endeavour to make the virtually of them. Thanks for reading my hub.
HoopSkirtMan on February 04, 2009:
I envy you ingenuity with being able to use your skills that fashion to make extra coin. Good for you lot!
C.South.Alexis (author) from NW Indiana on February 04, 2009:
SweetiePie,
I have about xxx years of experience, my life has revolved around a paintbrush and aye it does pay very good for physical labor. Estimate that could exist the next "How to kickoff a business" hub. My oldest son is a marriage painter. He said he did not want to learn to paint and I told him he had to acquire when he was 19 years old because, then he would have a skill he could ever autumn back on for work. I know considering I do it all the time.
Concluding month I did 2 small-scale jobs and the Art Studio Rent is paid up through June, It is a good skill to know. I take made an actress $2100. this twelvemonth, 2009, painting part time.
SweetiePie from Southern California, USA on Feb 03, 2009:
Only a thought, just have y'all ever considered offering your services equally painting peoples' houses? Some how I think people would pay some what expert money to do this because many exercise not want to take the attempt to paint.
C.S.Alexis (author) from NW Indiana on February 03, 2009:
Thanks Zsuzsy! Yes the sanding is messy but when that is done the worst is over, right?
Zsuzsy Bee from Ontario/Canada on Feb 02, 2009:
C.S. Great demonstration. I hate the sanding part with a passion
Super duper hub again
regards Zsuzsy
C.S.Alexis (author) from NW Indiana on Feb 02, 2009:
SweetiePie,
Thanks for reading my latest. my photos were stuck in my camera for over a week. This is where I am going to put my fine art studio. So far so good. Just thought I would write the hub as I worked on the place. I actually wrote the hub earlier I started working because I knew what I had to do. My nails look like the croaky paint and no fourth dimension for polish,LOL. I keep hoping to get moved in and and then something else comes up. The weather has been a large, dull me downwardly, factor and, they are calling for 5 to 8" by tomorrow night. Guess God and Mother Nature have their feet on my tail huh?
SweetiePie from Southern California, USA on Feb 02, 2009:
Wonderful hub! I love to paint and the clarification of the croaky paint reminds me of my nail polish. Information technology looks good for the first two days, then I add a layer because it begins to cleft. 2 more days it lasts, but by the quaternary or fifth twenty-four hours it is fourth dimension to kickoff over once again. Nice demonstration with photos by the manner.
C.S.Alexis (author) from NW Indiana on February 02, 2009:
Wow BK,
1851 is really an old i. I would try to fix it up if the foundation is good. In that location is a lot of labor that tin can go in to renovations but it is worth it especially if you love the onetime stuff. I sure do. Thanks for sharing and reading my hub. C.Due south.
BkCreative from Brooklyn, New York City on February 02, 2009:
This is timely! My building was built in 1851 and frankly I had decided to surrender. Just at present with a little guidance I may tackle some of what remains standing.
Thanks!
C.Due south.Alexis (author) from NW Indiana on Feb 02, 2009:
hot dorkage,
Yes it can if you allow it. I just recollect of it equally another work of fine art and it normally comes out pretty good. Thanks for commenting!
hot dorkage from Oregon, USA on February 02, 2009:
very useful. Mudding up a wall drives me nuts!

Source: https://dengarden.com/home-improvement/How-To-Repair-Walls-With-Many-Layers-Of-Uneven-Paint-Before-Repainting
Posted by: malchowount1970.blogspot.com
0 Response to "How To Repair Walls After Removing Wall Paper"
Post a Comment